|
|
|
Help Final Steps In Publishing Your Obituaries and Memory Cards as Transcriptions Using WebObitStep 1 - Checking For Mistakes Comments and QuestionsUsing the Report Tab look open questions "?" report and comments "!" report. These reports will list any data that you may want to edit again. See Editing and Adding Data for tips on uses of the "?" and "!" Tags. Look over your records for accuracy etc... Step 2 - Create A Folder For The Web TranscriptionOPTION 1 -- Website with Only One Obituary Database
OPTION 2 -- Website with with multiple Databases
Step 3 - Copy the Database To The Folder
Copy the database to the
Some_Obituary_or_Memory_Card_Name_Set Name
Folder. Step 4 - Make a Copy of the IMAGES folder to ImagesIn the obituary's IMAGES folder copy the images to the newly created IMAGES folder that was created in Step 2. Be certain that the images were copied and not moved. The IMAGES folder needs a copy because you may want to reduce their size for the website and you do not want to change the original images. Step 5 - Copy The WebObit FilesOPTION 1 -- Website with Only One Database
Copy all the WebObit files to the
Some_Obituary_or_Memory_Card_Name_Set Name Folder
OPTION 2 -- Website with with multiple Databases
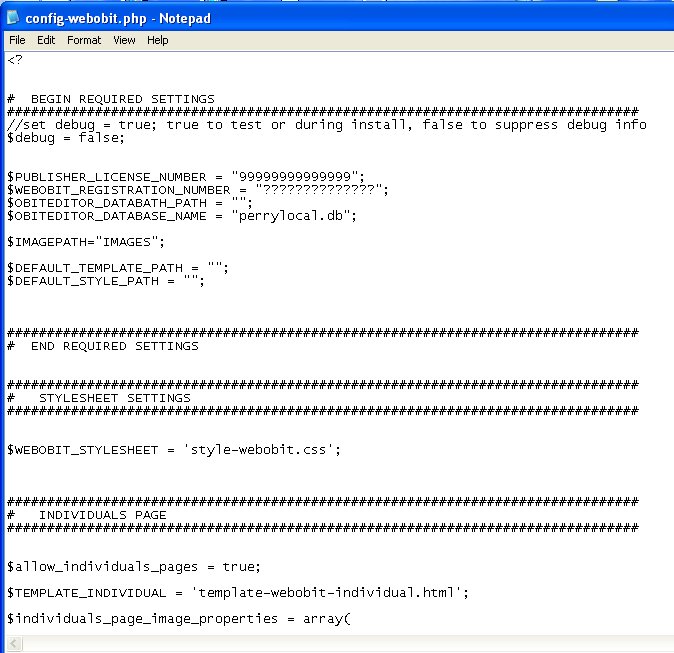
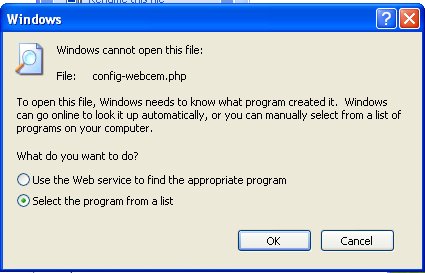
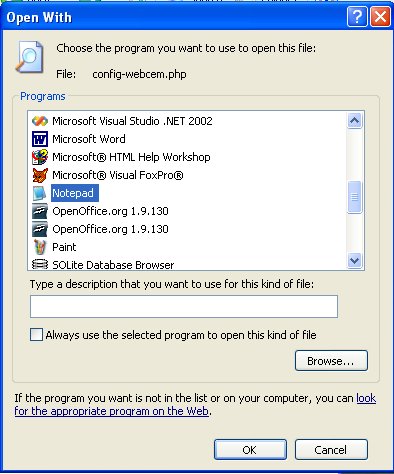
Step 6 - Edit The Config FileOpen the config file double clicking on webobit.php. If the PC has never edited a php file before you may receive the message asking to associate a program with the file.
If the "Windows cannot open this file" message is
displayed then choose "Select the program from a
list" then click "OK" Configure the WebObitOPTION 1 -- Website with Only One Database
OPTION 2 -- Website with with multiple Databases
Step 8 - Upload Files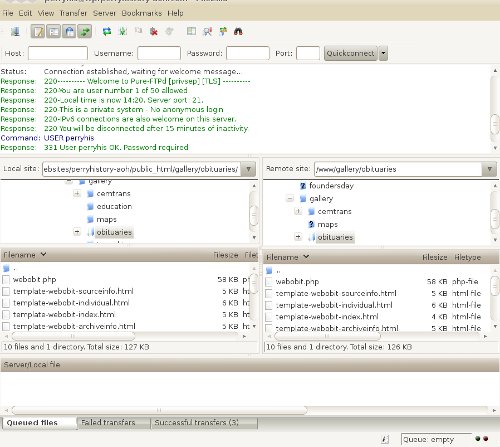
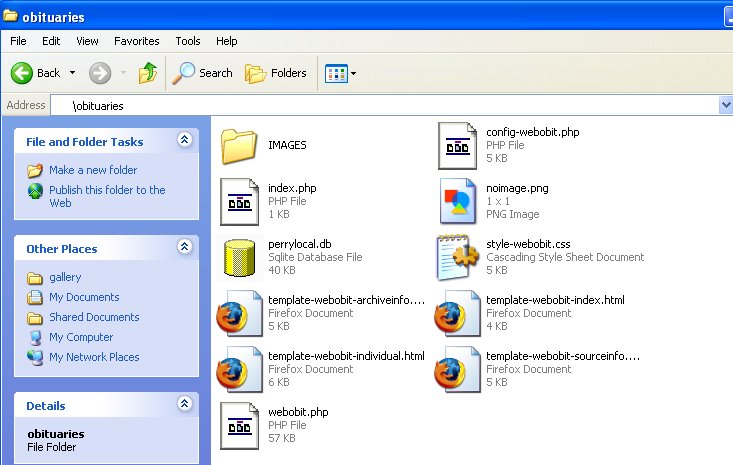
Files To DistributeThis is a list of the files, their extension, and where they need to be placed on the computer's directory/folder.These are the minimum files and folders that must be included: For a single transcriptionFILE STRUCTURE ON PCMy Documents -Obituaries (Folder) --SomeObituarySetName (Folder) --- SomeObituarySetName-sqlite.db (File) --- config-webobit.php (File) --- noimage.png (File) --- style-webobit.css (File) --- template-webobit-archiveinfo.html (File) --- template-webobit-index.html (File) --- template-webobit-individual.html (File) --- template-webobit-sourceinfo.html (File) --- webobit.php (File) --- IMAGES (FOLDER) -------- Picture1.jpg (File) -------- Picture2.jpg (File) -------- etc... Other files may be included, but the above are the minimum necessary for the WebObit Application to work correctlyFILE STRUCTURE ONLINE www -Obituaries (Folder) --SomeObituarySetName (Folder) --- SomeObituarySetName-sqlite.db (File) --- config-webobit.php (File) --- noimage.png (File) --- style-webobit.css (File) --- template-webobit-archiveinfo.html (File) --- template-webobit-index.html (File) --- template-webobit-individual.html (File) --- template-webobit-sourceinfo.html (File) --- webobit.php (File) --- IMAGES (FOLDER) -------- Picture1.jpg (File) -------- Picture2.jpg (File) -------- etc... For a multiple transcription databasesFILE STRUCTURE ON PCMy Documents -Obituaries (Folder) -- settings (Folder) --- noimage.png (File) --- style-webobit.css (File) --- template-webobit-archiveinfo.html (File) --- template-webobit-index.html (File) --- template-webobit-individual.html (File) --- template-webobit-sourceinfo.html (File) --SomeObituarySet-1-Name (Folder) --- SomeObituarySet-1-Name-sqlite.db (File) --- config-webobit.php (File) --- webobit.php (File) --- IMAGES (FOLDER) -------- Picture1.jpg (File) -------- Picture2.jpg (File) -------- etc... --SomeObituarySet-2-Name (Folder) --- SomeObituarySet-2-Name-sqlite.db (File) --- config-webobit.php (File) --- webobit.php (File) --- IMAGES (FOLDER) -------- Picture1.jpg (File) -------- Picture2.jpg (File) -------- etc... Other files may be included, but the above are the minimum necessary for the WebObit Application to work correctlyFILE STRUCTURE ONLINE www -Obituaries (Folder) -- settings (Folder) --- noimage.png (File) --- style-webobit.css (File) --- template-webobit-archiveinfo.html (File) --- template-webobit-index.html (File) --- template-webobit-individual.html (File) --- template-webobit-sourceinfo.html (File) --SomeObituarySet-1-Name (Folder) --- SomeObituarySet-1-Name-sqlite.db (File) --- config-webobit.php (File) --- webobit.php (File) --- IMAGES (FOLDER) -------- Picture1.jpg (File) -------- Picture2.jpg (File) -------- etc... --SomeObituarySet-2-Name (Folder) --- SomeObituarySet-2-Name-sqlite.db (File) --- config-webobit.php (File) --- webobit.php (File) --- IMAGES (FOLDER) -------- Picture1.jpg (File) -------- Picture2.jpg (File) -------- etc... |
|
|
|
Copyright 2004-2026 OVS-GENEALOGY OVS TAG
Contact: support@ovs-genealogy.com
To receive replies make sure to allow email from this address in your email filter
www.ovs-genealogy.com